How-to Restore A Motorcycle Damaged By Flood Water
Spring and summer flooding can be epidemic all over the world. Water can cause extensive damage to both riders and motorcycles. Here's an article from Honda Philippines on tips for how-to restore your beloved motorcycle should it be submerged in floodwater.

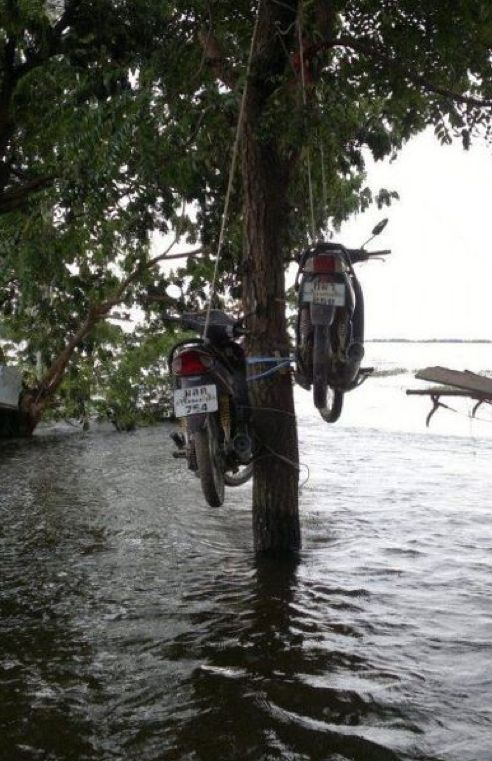
Scooter Trees are a common tourist attraction in Bangkok now
Don't wast time
Restoration of motorcycles damaged by flood should be done immediately because permanent damaged may occur as time passes by.
Wash the motorcycle immediately to remove mud using pressurized water and mild soap or dishwashing agent.
DON'T start the engine if there's a sign water entered the engine.
Here's what you'll need:
- Pressurized water that can be used for car or motorcycle washing
- Pail or bucket
- Paint brush
- Waste can
- Fuel Container
- Used oil container
- Drain pan
- Air compressor
- Sand paper
- Contact cleaning solution (available at an electronic shop)
- Lubricant / Corrosion inhibitor (available at any automotive parts stores)
- Wire Brush
- Kerosene
- Gasoline
- Engine oil (SAE 40, API SJ/ SAE 10W-40, API SJ)
- Multi-purpose grease
When Half of the Tire Submerged in Water - Water damage to the Front and Rear Axle
- Remove and clean the brake pads and system.
- Apply grease on the brake cam but DON'T apply grease to the brake lining.
- Clean the drive chain with kerosene and wire brush
- Lubricate drive chain with gear oil (SAE 80-90) and adjust the chain to the specified slack.
- Check the tire pressure and add air, if necessary, according to specification. If the tire will not inflate, check for leaks.
- Remove the speedometer gearbox, clean and apply grease.
When Water Covers the Entire Engine and Muffler - But not the Air Cleaner Box
- DO NOT ATTEMPT TO START THE ENGINE.
- Remove the exhaust muffler and wash it with kerosene, and let it dry before installing.
- Remove the spark plug then tilt the motorcycle to drain any water or mud.
- Drain the engine oil.
- Put approximately 30 ml or 3 tablespoons of gasoline into the combustion chamber through the spark plug hole.
- Drain the air compressor tank
- Apply compressed air and tilt the motorcycle again to drain any water. Repeat this step 2-3 times.
- Check the fuel line. Clean or replace the fuel strainer and overhaul the carburetor, then remove all foreign materials inside.
- Clean and check the spark plug gap, then conduct a spark test.
- Re-install the muffler, spark plug, and carburetor.
- Fill the crankcase with the recommended mixture of 50% engine oil and 50% Kerosene.
- Start the engine and let it idle for 5 -10 mins.
- Stop the engine and drain the mixture of kerosene and engine oil then properly dispose the mixture.
- Re-fill the engine oil according to the recommended volume.
- Start the engine, let it idle for 5-10 mins, and drain the oil. Repeat this process 2-3 times or more, until the whitish color of oil is eliminated, an indication that the water has been totally flushed out.
- Be sure to check the proper oil level.
- Check the front suspension, look for leaks caused by debris floating in flood waters.
- Check the rear suspension, look for leaks caused by same.
Fully Submerged Motorbike - Water from Ground to Brake Master Cylinder
- Perform all the procedures Water from Ground to Entire Engine and Muffler and then perform the additional steps below.
- Drain the fuel tank, check for corrosion on filler neck and lid. Clean with gasoline and apply compressed air.
- Drain the water from the utility box
- Remove the battery and clean the terminals, then recharged it.
- Wash the entire motorcycle with soap or dishwashing product.
- Check and clean the couplers of CDI, starter relay, and winker.
- Spray contact cleaner on all electrical couplers.
- Remove air cleaner box and replace air cleaner element.
- Check the condition of speedometer panels, clean and lubricate.
- Test the light bulbs sockets
- Test and clean all the switches and apply contact cleaner.
- Clean all the cables with pressurized water, then apply corrosion inhibitor.
- Clean and apply grease on all pivot joints of brake and clutch.
- Clean and lubricate steering ball bearings.
- Install all electrical couplers.
- Start the engine and check operations.
Good luck. Always bring your rain gear, wear safety gear when riding in the rain and ride safe!
Thank you to Honda Philippines for this How-to.
---
✌️ Editor’s Note: Take a look at these recommended products from our partners at Amazon; when you make a purchase, ESR will be paid a small commission fee. Thanks for your support!
- Helmets
- Bluetooth earbuds for under your helmet
- Reflective motorcycle backpacks!
- Phone cradle for motorcycle handlebars
- ESR T-shirt Shop
---